CRU Replacement
This topic provides information and procedures on installing Customer Replaceable Units (CRU) and Field Replaceable Units (FRU).
There are several procedures to turn on the system with the JBOD control board.
-
Plug the power cords into the rear of the JBOD power supplies.
-
Don’t yet plug in the power cords of the server.
-
Press the JBOD power button once. The JBOD control board will initiate the power up sequence.
-
Wait a few minutes for the JBOD to power up and spin up all disks.
-
Plug the power cords into the rear of the server power supplies.
-
Press the server power button once. The server will initiate the power up sequence.
-
Press the JBOD power button once. The JBOD control board will initiate the power up sequence.
-
Wait a few minutes for the JBOD to power up and spin up all disks.
-
Press the server power button once. The server will initiate the power up sequence.
The system will power up automatically after the power returns.
WARNING: If the JBOD disks are not detected after power on, reboot the server node once.
Hold down the power button for at least 4 seconds. The JBOD will power down.
Removing Power from the System
Before performing most setup or maintenance tasks, use the following procedure to ensure that power has been removed from the system.
- After the system has completely shut down, carefully grasp the head of the power cord and gently pull it out of the back of the power supply.
WARNING: If your system has dual power supplies, remove the cords from both power supplies.
- Disconnect the cord from the power strip or wall outlet.
• Use a grounded wrist strap designed to prevent static discharge.
• Handle the memory module by its edges only.
• Put the memory modules into the antistatic bags when not in use.
Caution: Exercise extreme caution when installing or removing memory modules to prevent damage to the DIMMs or slots.
Remove power from the system.
Push the release tabs outwards on both ends of the DIMM slot to unlock it.

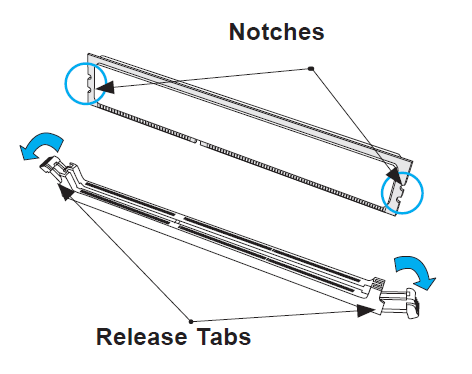
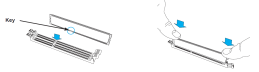
Align the key of the DIMM with the receptive point on the memory slot and with your thumbs on both ends of the module, press it straight down into the slot until the module snaps into place.

Press the release tabs to the locked position to secure the DIMM module into the slot.
To remove a DIMM, unlock the release tabs then pull the DIMM from the memory slot.
